Are you looking to add sleeves to your sleeveless tops and dresses? Do you find drafting a sleeve pattern challenging? Does sewing a Set-in sleeve just as daunting? Does the extra ease on the sleeve cap pose another challenge to sewing a smooth pucker-less sleeve? If the answer to all the questions are a resounding Yes, please read on to learn more about My Sloper Sleeve.
Design Sleeve Pattern
Bodice blocks come in various fit and styles. Fitted bodice blocks and industrial bodice blocks may be designed with the front bodice either wider or narrower than the back bodice at the chest line. Looser fitting bodice blocks are generally designed to be symmetric in both front and back because of the extra chest ease that provides wearing comfort and modesty. Some bodice blocks are designed to have a forward shoulder line, which means the front bodice armscye length is shorter on than the back bodice armscye length.
Here are a few of the sample bodice blocks without seam allowance that are generated from a commercial pattern making software.
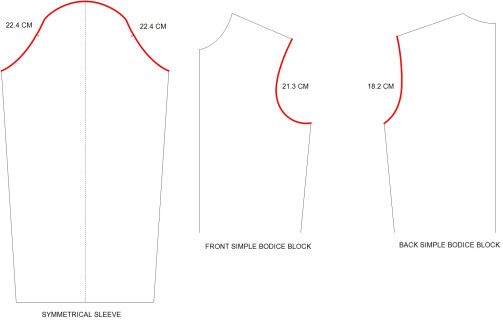
Fitted Bodice Blocks with Symmetric Sleeve Block

Fitted Bodice Blocks with Symmetric Sleeve Block for Women
Notice the varying front and back armscye lengths for the bodice and the symmetric sleeve block. When we add up the dimensions, the sleeve generates a 5.3-cm ease at the sleeve cap. This type of sleeve requires a Set-In Sleeve sewing technique.
Simple Bodice Blocks with Symmetric Sleeve Block
Simple Dartless Bodice Block with Symmetric Sleeve Block
These blocks are similar in nature to the Fitted Bodice Blocks above except that the bodice blocks do not come with bust and waist darts. With a 5.3-cm ease at the sleeve cap, the symmetric sleeve will also require a Set-In Sleeve sewing technique.
Industrial Fitted Bodice Blocks with Asymmetric Sleeve Block
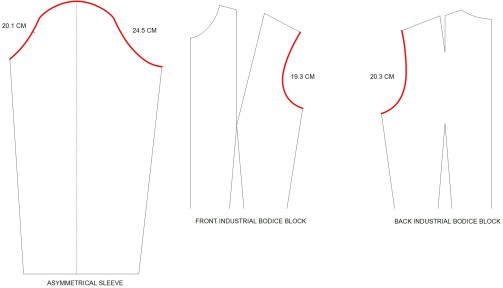
Industrial Bodice and Sleeve Blocks for Women
These industrial blocks are designed to be narrower on the front bodice and wider on the back bodice at the chest line. The asymmetric sleeve block produces a 0.8-cm ease at the front sleeve cap and a 4.2-cm ease at the back sleeve cap. This type of sleeve also requires a Set-In Sleeve sewing technique.
Flat Bodice Blocks with Symmetric Sleeve Block

Child’s Flat Bodice Blocks with Symmetric Sleeve Block
These blocks are designed for children. Note that symmetric bodice armscye lengths as well as the symmetric sleeve. Even then, the 4.0-cm ease at the sleeve cap will require the Set-In Sleeve sewing technique.
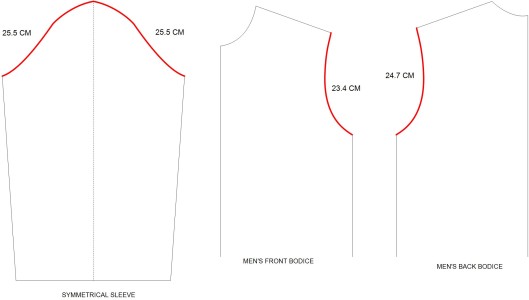
Men’s Bodice Blocks with Symmetric Sleeve Block
These blocks are designed for a man’s measurement. Like the child’s block, the symmetric sleeve will require a Set-In Sleeve sewing technique due to the relatively small but noticeable 2.9-cm ease at the sleeve cap.
Set-In Sleeve Sewing Technique
This technique for sewing a sleeve requires a lot of patience and time and mastery in order to overcome the challenges of producing a smooth pucker-less sleeve cap at the shoulder and armscye. What if there is a better way to produce smooth pucker-less sleeve caps, by reducing the ease at the sleeve cap?
My Sloper Sleeve
My Sloper Sleeve comes to the rescue. Over the past few years, KosherPatterns.com has been producing the My Sloper series pattern-making software for the modesty-conscious consumer. Our goal is to design sleeves that are easy to sew by eliminating the ease at the sleeve cap. Our earlier designs have been successful in eliminating this extra ease, however, they have required a little bit of tweaking at the sleeve cap in order to produce a smooth sleeve cap design that’s pleasing to the eye. Recently, with gratitude to G-d, we have improved our design to remove this extra “tweaking.” This tweaking is now done automatically by the software without the need for manual intervention by the consumer. We are very pleased to announce My Sloper Sleeve 3.0, a lightweight, portable, standalone Web application that runs on Firefox for the best delivery.

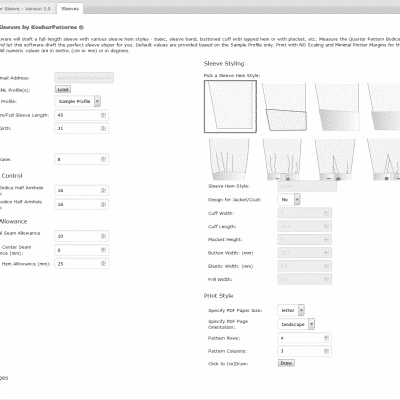
My Sloper Sleeve 3.0
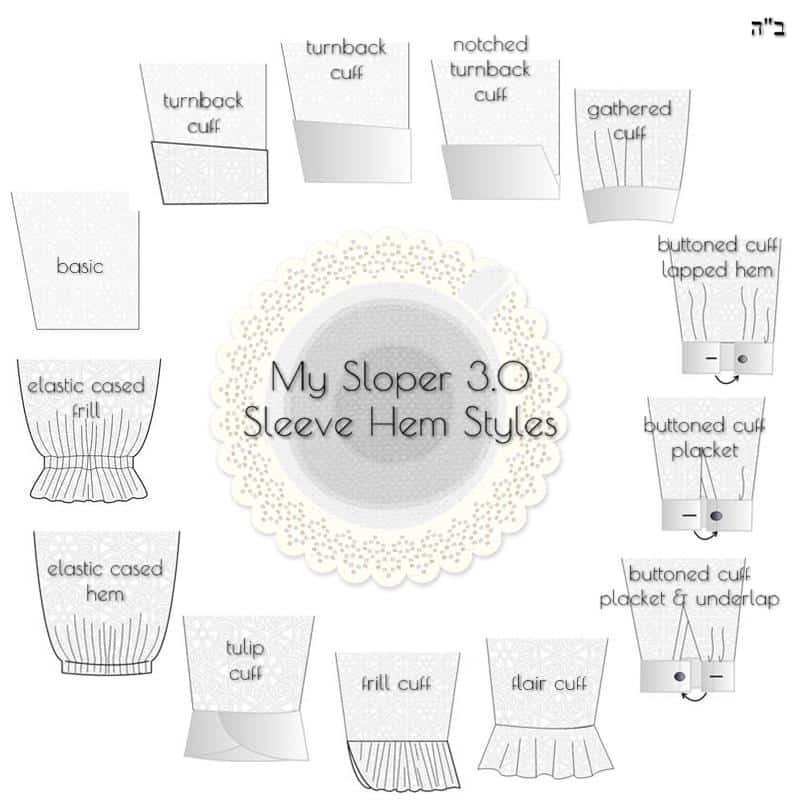
My Sloper Sleeve 3.0 supports 13 sleeve hem styles from the basic full sleeve to sleeve with cuffs. There are 3 turnback cuff styles, 3 buttoned cuff styles, 2 elastic cased styles, 1 gathered hem with band cuff and these additional cuffs: flair, frill and tulip.
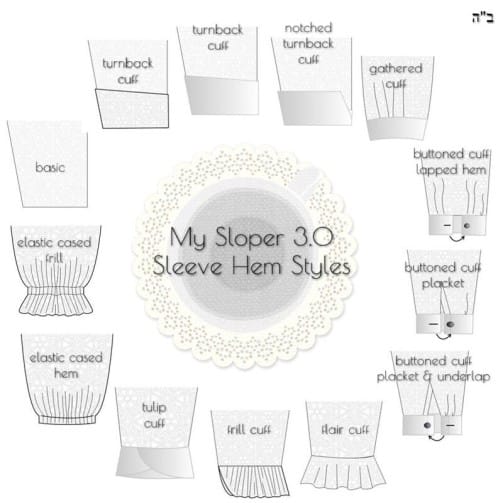
My Sloper Sleeve 3.0 Hem Styles
5 Critical Pieces of Data
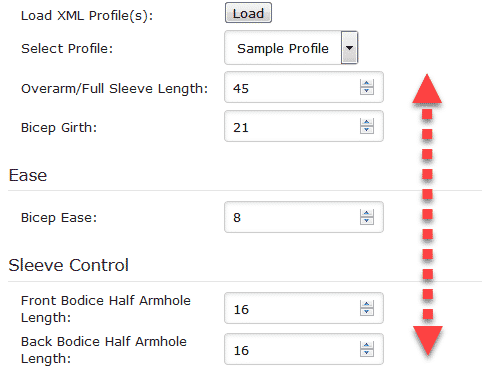
5 Critical Sleeve Data
We need 5 pieces of critical data for My Sloper Sleeve 3.0. The first two, the Overarm length to create a full-length sleeve and the Bicep Girth are needed from the subject. The third, the Bicep Ease, is needed for a comfortable wearing ease. 6-8 cm is recommended for comfort and modesty. The last two are obtainable from the front and back Bodice blocks. Measure the armscye length from a quarter Bodice block for the front and back.

Bodice Armscye Lengths from Front and Back Bodice Blocks
A sample Sleeve Block generated from My Sloper Sleeve 3.0 is as follows:
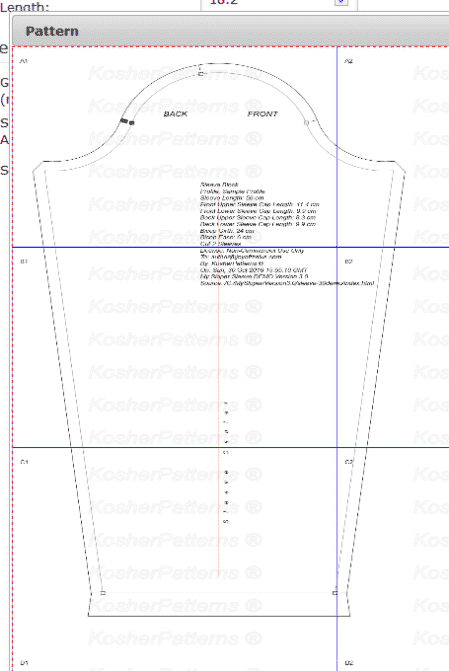
Sample Sleeve Block from My Sloper Sleeve
Use the values printed on the Sleeve Block to transfer the Sleeve Cap notches to our Bodice blocks.
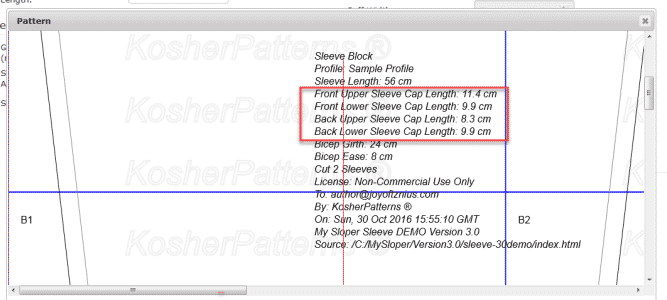
Sleeve Cap Measurements
Use the Lower Sleeve Cap Lengths for the placement of the Bodice Armhole notches for front and back. Use either one of the Upper Sleeve Cap Lengths to determine the top notch of the Sleeve Cap that matches the shoulder line.
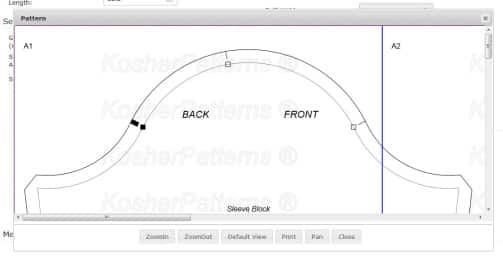
Sleeve Cap Sample
My Sloper Sleeve 3.0 Advantages
Use My Sloper Sleeve 3.0 to:
- Add sleeves to a sleeveless pattern.
- Replace an existing sleeve pattern with a No-Ease Sleeve Cap pattern from My Sloper Sleeve. With zero sleeve cap ease, sewing sleeves will be a delight again.
- Replace a short sleeve pattern with a full-length sleeve pattern from My Sloper Sleeve.
- Add variation to the basic sleeve pattern from the free My Sloper Blouse Demo and My Sloper Dress Demo.
How to Sew a No-Ease Sleeve
Use the flat construction method to attach the no-ease sleeve to our bodice.
Part 1. Attach Sleeve Cap to Bodice Armhole
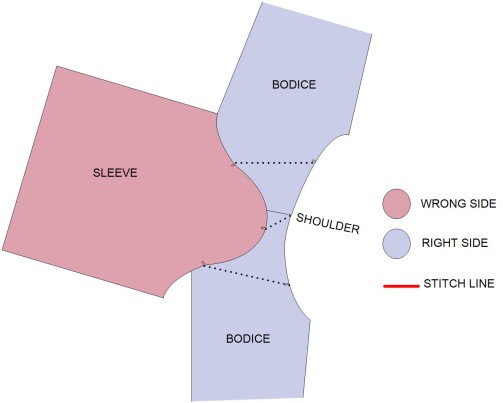
Flat Construction Method
- Firstly, sew the front and back bodices at the shoulder line.
- With the bodices on the bottom and the sleeve on top, right sides facing, match the sleeve cap notches to the bodice armhole notches. The middle notch of the sleeve cap should match the shoulder line.
- Start sewing from one end of the sleeve cap to the first notch.
- Beyond this notch, sew slowly and carefully to the second middle notch located at the top of the sleeve cap where it matches the shoulder.
- Then, sew pass this second notch to the third notch.
- Continue sewing from third notch to the end of sleeve cap.
Between the first and third notches, we may notice ripples on the sleeve curve while we sew and this is normal. We are trying to match a convex (outward) sleeve curve to a concave (inward) armhole curve. What we have to watch out for is that the bottom bodice fabric remains flat at the entire time when we sew between the notches. In our experience, any pucker that may appear is not on the sleeve cap, but on the bodice armhole itself. So, remember to flatten the bottom bodice fabric when we sew between the notches.
Part 2. Sew Sleeve and Bodice Side Seams
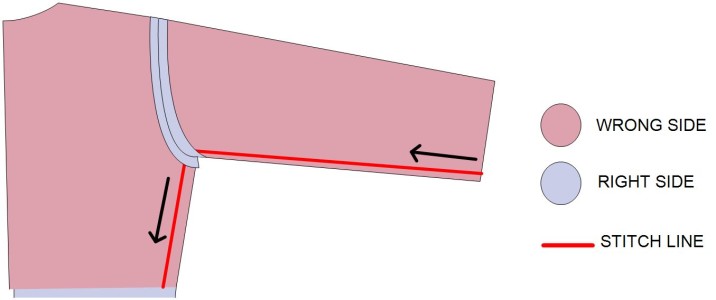
Flat Method Construction Continuation
- Turn the bodices and sleeve with their wrong sides facing us.
- Fold sleeve in half right sides facing and match the front and back bodices right sides facing.
- Starting from the sleeve hem, stitch along the sleeve side seam towards the armhole and continue along the bodice side seams until the bodice hem.
Sample Sleeves
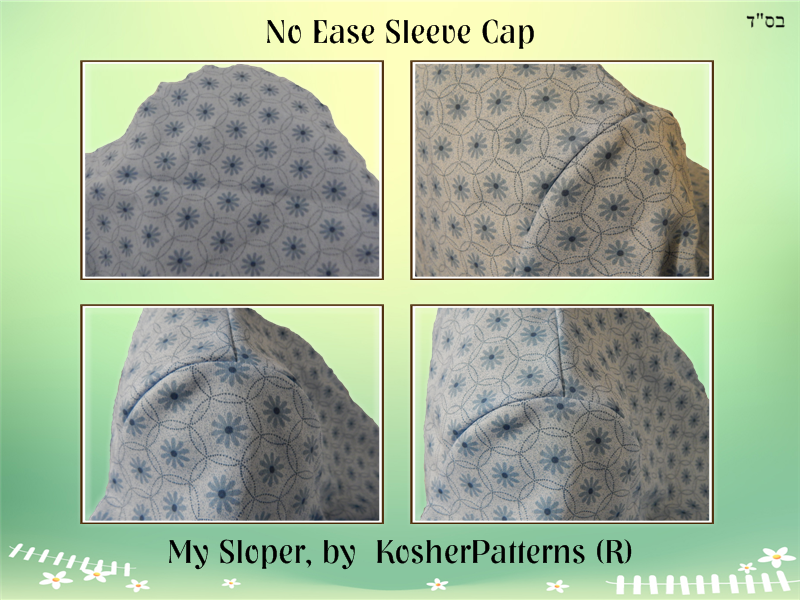
No Ease Sleeve CAp
